Unlocking Augmented Reality: A Beginner’s Guide to Building Your First AR App

The concept of augmented reality (AR) has fascinated humanity for decades, long before technology made it a reality. In Pygmalion’s Spectacles (1935), Stanley G. Weinbaum envisioned a set of goggles that transported users into a fully immersive, interactive world — a vision that strikingly foreshadows modern AR and VR technologies.
Today, AR seamlessly blends virtual elements with our physical world, enriching real-life experiences through interactive and immersive digital overlays. Unlike virtual reality, which creates entirely separate environments, AR enhances our perception of reality by adding new layers of information and interaction.
In this article, you’ll learn how to build your first marker-based AR application using Unity and the Vuforia Engine. No prior experience in Unity is required, however, it will be handy if you know the basics of transformations in Unity.
1. Install Unity
Install Unity and setup for android platform. You can follow the official documentation from https://docs.unity3d.com/Manual/android-sdksetup.html
2. Download the Vufora package for Unity
Visit ‘https://developer.vuforia.com’ and create an account for free. After that, go to Downloads and Download the vuforia package for Unity.

3. Setup Vuforia Engine for Unity
a) Open Unity Hub and Create a New Project. Select the 3D ( Built-in Render Pipeline ) template, give a project Name and then Create Project.

b) You need to start by first importing the Vuforia Package in the Unity Engine. Simply Open the file location where you downloaded the package, and Drag and Drop the package in the Project Window of Unity.
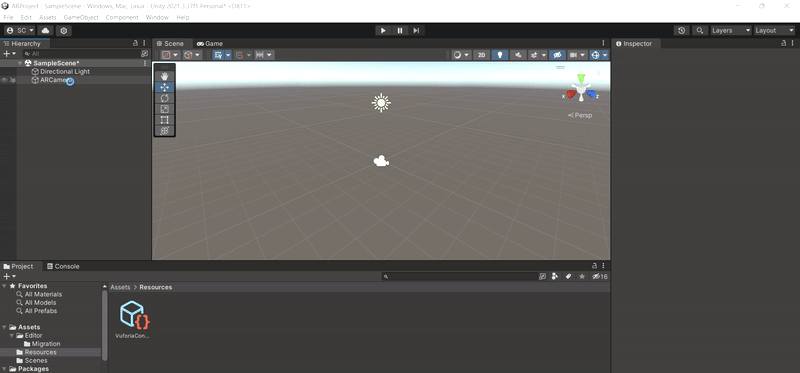
Delete the existing Main Camera and Import the AR Camera from the Hierarchy Window.
c) Get a license key to use the Vuforia Engine. Vuforia Provides a Basic License for Free. For that, you just need to visit ‘https://developer.vuforia.com/develop/licenses’ and ‘Generate a Basic License’ for free. Give a name to your application and then copy the generated license key.

Add the License to the Vuforia Engine Configuration. Click the AR Camera, then in the Inspector Window, Open Vuforia Engine Configuration and Paste the copied license key to the App License Key.
d) Unity allows you to build the application in multiple platforms. We’ll be using Android, since it is the most common platform. Go to File > Build Settings > Android > Switch Platform. Also, Click on the Add Open Scenes to ensure that your scene is included.

3. Create a Target Database
Now that we’ve set up Vuforia and Unity, We’ll proceed to create a target Database using Vuforia’s Target Manager.
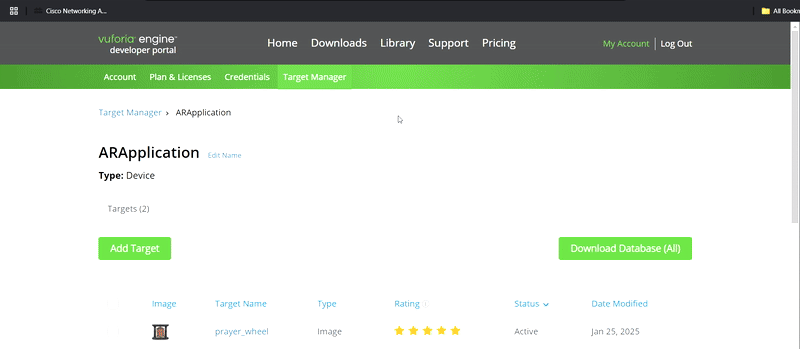
a) Head to https://developer.vuforia.com/ > My Account > Target Manager. Then Click on ‘Generate Database > Device’. Dont forget to enter a name for the database. The database will appear in the list below. Click on the name of your database then, Click Add Target and type: Image. Select an Image from your computer that you want to use as a target. You can select multiple Images.
Vuforia also provides a rating for your target. Vuforia uses unique feature points from your image to identify the target. The better and more unique your image is, the better is its rating. If the rating is more than 3 stars, you are good to go.

You can also see the feature points by clicking the image and then, Show Feature Points.
b) Download the Target Database ( Unity ). The database will be downloaded as a Unity Package.
c) Drag & Drop the database to the asset in the Project Window.

Now comes the most important part, Actually creating the Image Target and Linking a 3D Object with it. You can find plenty of free 3D models online or create it yourself with 3D modeling softwares like Blender.
d) Import the 3D Models in the Assets in the Project Window. You can create a folder for each model to properly manage the assets. Simply select all the files related to an asset, then Drag & Drop the asset files.

e) To create an Image target, Right Click on the Project Window, Navigate to Vuforia Engine then Select the Image Target. Rename it to something meaningful.
f) In the Inspector Window, in the Image Target Behaviour (Script ), select Type: From Database, then the database as your target database, and select an Image. The Image will appear in your scene.
g) Drag the 3D model to the Hierarchy Window, as a direct child of the image target. Perform Necessary transformations like scaling, translating etc. to place the 3D object just above the marker.
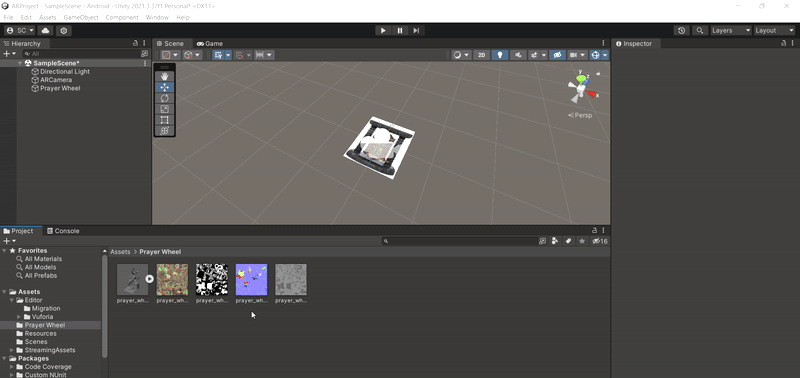
Important: Click the target in the hierarchy window, and from the inspector window In Default Observer Event Handler ( Script ), change the ‘Consider target visible if its status is: ‘ dropdown to ‘Tracked’.
Your Scene window should look like this:

( Optional )If you want multiple images to be detected at once, you should change the Max Simultaneous Tracked Images from the AR Camera> Inspection Window > Vuforia EngineConfiguration to a different value like 2.
4. Final Steps:
You can test if everything is working properly by clicking the ‘play’ button located just above the scene window.
Change the Aspect Ratio to 1920 x 1080 Potrait from the Dropdown if you’re building it for a mobile phone.

5. Build the Application
Go to File > Build Settings > Build to build the apk. Check the Development Build to allow for USB Debugging. Connect and Select your device from the Run Device dropdown and then Patch and Run to debug on your phone.
Building may take some time, so have patience.
Congratulations !! You built your first AR Application.
